


Mounting kit for Raspberry Pi by Raspberry, model 18214 — board mounting accessories
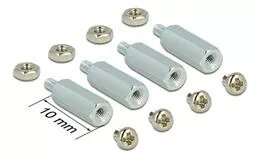
Short description

Cheapest delivery:
Unisend LV
Product information
Description
Mounting kit for Raspberry Pi by Raspberry, model 18214 provides the hardware needed to secure a Raspberry Pi single-board computer inside enclosures, mounts or custom housings. The kit contains metal spacers, screws and nuts designed to fasten the board reliably for hobbyist, educational and prototyping applications where a stable mechanical fixation is required.
Advantages
This mounting kit offers a compact set of components specifically matched to Raspberry Pi boards, enabling simple and repeatable installation. Using dedicated spacers keeps the board elevated from the mounting surface to prevent shorts and allow airflow, while the included screws and nuts provide a secure mechanical connection suitable for stacked boards or single-board installations.
Suitable for
- Securing a Raspberry Pi inside a project enclosure or case
- Stacking multiple Raspberry Pi boards with spacing between layers
- Educational kits and classroom prototyping where repeated assembly is needed
- Custom housings, mounts or electronics benches requiring fixed board position
Key specifications
- Includes metal spacers, screws and nuts for board mounting
- Spacers: M2.5 thread, 10 mm length (4 pieces)
- Screws: M2.5 × 4 mm length (4 pieces)
- Nuts: M2.5 (4 pieces)
- Compatible with Raspberry Pi single-board computer form factors
How to use
Place the Raspberry Pi onto the mounting surface or inside the enclosure aligning the board mounting holes with the spacer positions. Insert the M2.5 spacers through the mounting holes, secure them on the opposite side with the M2.5 nuts if required, then fasten the board using the M2.5 × 4 mm screws. For stacked installations, fit spacers between boards to maintain the specified clearance and repeat the fastening procedure for each layer.
Usage recommendations
When installing, ensure screws are tightened evenly and not over-torqued to avoid damaging the PCB. Verify spacer length provides sufficient clearance for connectors and components. Use appropriate anti-static precautions when handling the board during assembly.


